0%

This is my first post. I refer to the theme of NexT Organization. Check documentation for more information about Hexo.

Quick Start For Hexo

Create a new post

1
$ hexo new "My New Post"

More info: Writing

Run server

1
$ hexo server

More info: Server

Generate static files

1
$ hexo generate

More info: Generating

Deploy to remote sites

1
$ hexo deploy

More info: Deployment

1. 图片插入

安装图片插件

1
npm install hexo-asset-image --save

配置文件_config.yml

将post_asset_folder设置为true

然后就可以直接引用了

1
![(添加图片描述)](AI.jpg)

AI

2. 音频插入

插入本地绝对路径音频

1
2
3
<audio controls autoplay>
<source src="/local/audio/music.mp3" type="audio/mpeg">
</audio>
Music

插入音频url

1
<iframe frameborder="no" border="0" marginwidth="0" marginheight="0" width=430 height=86 src="//music.163.com/outchain/player?type=2&id=114389&auto=0&height=66"></iframe>

3. 视频插入

插入本地绝对路径视频

1
2
<video src='/local/video/oceans.mp4' type='video/mp4' controls='controls'  width='100%' height='100%'>
</video>

插入视频url

1
2
<video src='http://clips.vorwaerts-gmbh.de/big_buck_bunny.mp4' type='video/mp4' controls='controls'  width='100%' height='100%'>
</video>

Bokeh快速入门

绘图步骤:

  • 准备数据
  • 选择结果输出方式

可以用output_file()输出为"lines.html". 也可以使用output_notebook()在 Jupyter notebooks中直接展示。

  • figure()绘制画布
  • 绘制图形,如line()
  • 显示绘图结果

举个栗子:

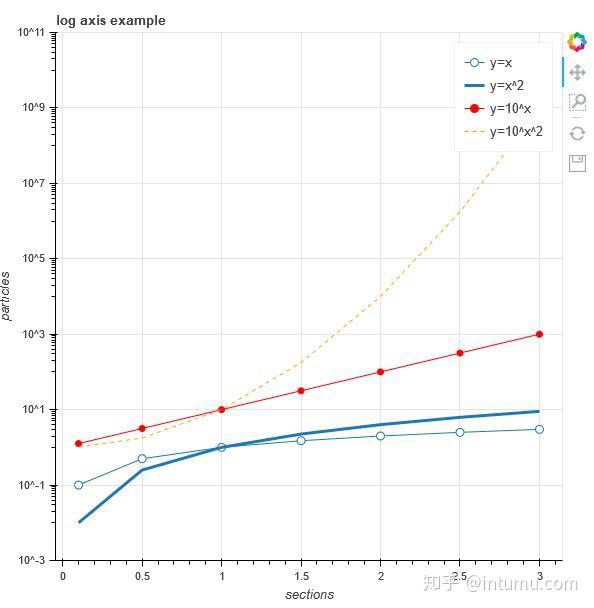
01_显示多条曲线,用用output_file()展示:

1
2
3
4
5
6
7
8
9
10
11
12
13
14
15
16
17
18
19
20
21
22
23
24
25
26
27
28
from bokeh.plotting import figure, output_file, show

# 准备数据
x = [0.1, 0.5, 1.0, 1.5, 2.0, 2.5, 3.0]
y0 = [i**2 for i in x]
y1 = [10**i for i in x]
y2 = [10**(i**2) for i in x]

# 输出为静态的html
output_file("log_lines.html")

# 创建画布
p = figure(
tools="pan,box_zoom,reset,save",
y_axis_type="log", y_range=[0.001, 10**11], title="log axis example",
x_axis_label='sections', y_axis_label='particles'
)

# 添加曲线
p.line(x, x, legend="y=x")
p.circle(x, x, legend="y=x", fill_color="white", size=8)
p.line(x, y0, legend="y=x^2", line_width=3)
p.line(x, y1, legend="y=10^x", line_color="red")
p.circle(x, y1, legend="y=10^x", fill_color="red", line_color="red", size=6)
p.line(x, y2, legend="y=10^x^2", line_color="orange", line_dash="4 4")

# 显示结果
show(p)

img

转载于Bokeh快速入门

FFmpeg指令

1. 提取视频

os.system(‘ffmpeg -i %s -r 25 -an %s -loglevel quiet’%(video_raw, video_new))

os.system(‘ffmpeg -i %s -r 25 -strict -2 %s -loglevel quiet’%(video_raw, video_new))

os.system(‘ffmpeg -i %s -vcodec copy -an %s’%(video_raw, video_new))

参数解析:
【-vcodec copy】复制原视频编码格式

【-r】视频帧率

【-an】将音频流剔除,可以理解为audio none

【-loglevel quiet】不打印编译过程

2. 提取视频中的音频(提取出单独的音频文件)

os.system(“ffmpeg -i %s -f wav -ac 2 -ar 16000 -ab 16k -vn %s -loglevel quiet” % (video_raw, wav_raw))

【-acodec copy】复制原音频编码格式
【-vn】将视频流剔除,可以理解为video none
【-f wav】设置音频格式为wav
【-ar 16000】设置音频采样率为16000
【-ab 256k】设置音频比特率为256k

综上,剔除音频最重要的是-an,剔除视频-vn是最主要的参数,其他参数可根据自己的需求自行添加设置。

3. 合成音视频

os.system(‘ffmpeg -i %s -i %s -c:v copy -c:a aac -strict experimental %s -loglevel panic’%(video_only,audio_only,video_merge))